Monday, October 23, 2023

Outlining in Visual studio


Hide Selection (Ctrl+M, Ctrl+H): If you want to hide a part of your code, like a specific section within an 'if' statement, you can use this. To show it again, you can use "Stop Hiding Current."


Toggle Outlining Expansion (Ctrl+M, Ctrl+M): If a part of your code is hidden, this will show it. If it's already showing, this will hide it. It's like a switch to hide and show the innermost code section where your cursor is.


Toggle All Outlining (Ctrl+M, Ctrl+L): This command allows you to either hide or show all the hidden parts in your code at once. If some are hidden and some are showing, it makes everything show.


Stop Outlining (Ctrl+M, Ctrl+P): This removes all the hidden parts in your entire document. To turn hiding back on, you would follow the menu path in the original description.


Stop Hiding Current (Ctrl+M, Ctrl+U): If you have hidden a specific part of the code that you defined yourself, you can show it again with this.


Collapse to Definitions (Ctrl+M, Ctrl+O): This hides everything except the titles or definitions of functions, classes, etc., to give you a clean view of what's in your code.


Collapse Block (C++): If your cursor is inside a particular section of code like a loop, you can hide just that section with this command.


Collapse All in (for specific structures): This is a general command that lets you collapse certain logical parts of the code, like functions or loops, depending on what you choose.


These commands are useful in coding environments to help you manage how you view your code, making it easier to work with large files.

Link


If you've made it this far, please leave a kind word. Your encouragement fuels my desire to produce and share even more valuable content.

Friday, October 20, 2023

Turn on navigation path

How to turn on the navigation path in Dynamics 365 fo

Go to System Administration

System administration module

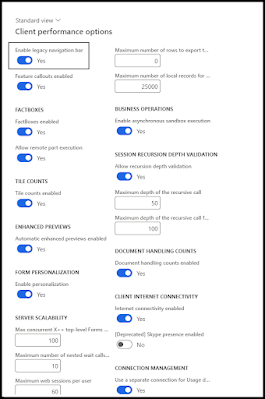
Select System Administration > Setup > Client performance options > 

Client performance option form

Toggle “Yes” to Enable legacy navigation bar

Tada!!!

Wednesday, October 11, 2023

RecordInsertList in Dynamics 365 FO

In this blog of Dynamics Community 101 we will learn RecordInsertList in Microsoft Dynamics 365 F&O

RecordInsertList

In Dynamics 365 Finance & Operations (F&O), the RecordInsertList class is a helpful mechanism for efficiently inserting multiple records into a database table. It's more efficient than using a standard insert in a loop as it batches the inserts, reducing the number of database operations.

Here's a simple example that involves the CustTable, which stores customer information.

Declare a variable of RecordInsertList type - Declare a variable that references a RecordInsertList object. Specify the table you're working with; in this case, the CustTable.

Create the records - Use the new keyword to create a CustTable buffer, and then assign the fields' values.

Add the records to the RecordInsertList - Use the add method on your RecordInsertList object to add each record to the list.

Insert the records - Call the insertDatabase method to insert all the records in the list into the database.

Here's a code snippet to illustrate these steps:

static void InsertCustTableExample(Args _args)

{

    CustTable custTable;

    RecordInsertList recordInsertList = new RecordInsertList(tableNum(CustTable));


    // Loop to create records

    for (int i = 1; i <= 10; i++)

    {

        custTable.AccountNum = strFmt("CUST%d", i);

        custTable.Name = strFmt("Customer %d", i);


        // Add the record to the RecordInsertList

        recordInsertList.add(custTable);

    }


    // Insert the records into the database

    recordInsertList.insertDatabase();

    info("Records inserted successfully.");

}


This example will insert 10 records into the CustTable. By using RecordInsertList, you're making the insertion more efficient compared to standard insert operations in a loop. It's a useful tool to have in your arsenal, particularly when dealing with large data sets.

If you've made it this far, please leave a kind word. Your encouragement fuels my desire to produce and share even more valuable content.

Monday, October 9, 2023

Dynamics 365 fo types of functions and classes and special classes

In this blog of Dynamics Community 101 we will learn about types of functions and classes and special classes in Microsoft Dynamics 365 F&O


Interactive type of class

 Functions:


Static Functions: These functions are tied to the class rather than an instance. They can be called without creating an instance of the class. They're commonly used for utility functions that don't rely on instance-specific data.

Instance Functions: These functions require an instance of the class to be invoked. They operate on the data that belongs to the object and are responsible for object-specific behavior.

Main Method: This is the entry point for class execution, usually for testing or batch processing. The main() method is static and can accept command-line arguments.

Final Functions: These are functions that cannot be overridden in derived classes. This ensures that the implementation of the function remains consistent.

Abstract Functions: These functions don't have any implementation in the base class. Derived classes must provide an implementation for these functions, making them ideal for defining a common interface.


Classes:


Table Classes: These classes directly represent tables in the AOT (Application Object Tree). They're automatically created and can be extended but not modified.

Form Classes: These are auto-generated when you create a form in the AOT. They contain methods that run form logic and control form events.

Data Provider Classes: Used primarily for SSRS reports, these classes gather the data that is then displayed on the report.

Framework Classes: These classes provide foundational structures for common functionalities. Classes like RunBase and RunBaseBatch are examples that provide a standardized way to create batch jobs or runnable classes.

Helper Classes: These are custom-defined classes that encapsulate shared logic or functionalities that can be reused across modules.

Controller Classes: These classes act as mediators in complex operations like reporting or batch processing, organizing the overall execution flow.

Contract Classes: These are used to encapsulate parameters for services or reports, making it easier to manage and validate the input.

Extension Classes: These allow you to add new methods to existing table, form, or class objects without altering the original codebase.

Attribute Classes: These are special classes that act as metadata, allowing you to tag elements in the code for additional behaviors or properties.

Map Classes: These simulate tables but don't involve data storage in the database. They're useful for temporary data manipulation tasks.


Special Classes:


Global Class: This class contains global methods and variables that can be accessed across the application, serving as a utility hub.

Application Classes: Classes like Info, ClassFactory, and Global that serve specific application-level functionalities.

Sys Classes: These are system-level classes such as SysDictTable, SysQuery, and SysFormRun. They are crucial for interacting with system-level functionalities and metadata.

If you've made it this far, please leave a kind word. Your encouragement fuels my desire to produce and share even more valuable content.
Thursday, October 5, 2023

Optimizing Disk Space Managing MSSQL Logs on Dynamics 365 (Drive H)

Occasionally, you may encounter disk space issues on your H-drive (logs) due to the continuous filling of the transaction log.


In the displayed screenshot, it's evident that logs partition is nearing its capacity. This has hindered the import of an additional database, as SQL Server notifies me of insufficient disk space.

There is a solution suitable for development settings has been identified.

Follow these steps to manage logs in the AxDB database:

Launch SSMS
In the Object Explorer, navigate to the Databases folder, and right-click on 'AxDB'

In the properties of AxDB, you will see something like below


Here take the name of the second file and replace the name in the below query

Select 'New Query' from the context menu.
In the new query window, input the following code:


USE AxDB;
GO

ALTER DATABASE AxDB
SET RECOVERY SIMPLE;
GO

DBCC SHRINKFILE (AXdb277_log, 1);
GO

ALTER DATABASE AxDB
SET RECOVERY FULL;
GO


Executing this query can help manage the log files in AxDB, improving the performance and maintainability of your Dynamics 365 development environment.


If you've made it this far, please leave a kind word. Your encouragement fuels my desire to produce and share even more valuable content.

Tuesday, August 22, 2023

Create access token from c sharp code and get it in dynamics 365 FO

C#
using System;
using System.Collections.Generic;
using System.Linq;
using System.Text;
using System.Threading.Tasks;
using System.Net.Http;

namespace AY_AccessToken
{
    public class ClassAccessToken
    {
        private static string clientId = "2539b54-0891-4aad-99a6";
        private static string clientSecret = "H18Q~DntOA9aQX";
        private static string resource = "https://10devadevaos.axcloud.dynamics.com";
        private static HttpClient httpClient = new HttpClient();

        public static string GetAccessToken()
        {
            var content = new StringContent($"grant_type=client_credentials&client_id={clientId}&client_secret={clientSecret}&resource={resource}");
            content.Headers.ContentType = new System.Net.Http.Headers.MediaTypeHeaderValue("application/x-www-form-urlencoded");
            var response = httpClient.PostAsync("https://login.microsoftonline.com/bacbd475-b9da-43fa/oauth2/token", content).GetAwaiter().GetResult();
            var result = response.Content.ReadAsStringAsync().GetAwaiter().GetResult();
            string accessToken = result.Split(':')[1].Split(',')[0].Replace("\"", "");


            string search = "\"access_token\":\"";
            int start = result.IndexOf(search) + search.Length;
            int end = result.IndexOf("\"", start);
            string accessTokenFinal = result.Substring(start, end - start);
            return accessTokenFinal;
        }
    }
}


Dynamics 365 F&O code to get the token:

using AY_AccessToken;
internal final class RunnableClass1
{
    public static void main(Args _args)
    {
        str accessToken;
        accessToken = ClassAccessToken::GetAccessToken();
        info(accessToken);
    }
}

Friday, August 11, 2023

Aggregate dimensions and aggregate measurements in Dynamics 365 FO

Aggregate dimensions and aggregate measurements in Dynamics 365 Finance and Operations (F&O) are components used within reporting and analytics.


Aggregate Dimensions: These are attributes or characteristics that allow data to be categorized and grouped. They are typically used to filter or slice data within reports. For example, an aggregate dimension might be a product category, region, or salesperson. By using these dimensions, you can summarize and analyze data in a way that makes sense for your organization.


Aggregate Measurements: These refer to the actual data values that are being summarized and analyzed. Aggregate measurements include things like total sales, quantity sold, or profit margins. They are typically used in conjunction with aggregate dimensions to provide a comprehensive view of the data. Aggregate measurements can be viewed in various summaries such as sums, averages, counts, etc.


In Dynamics 365 F&O, both components play an essential role in creating powerful and insightful reports. Aggregate dimensions provide the framework for viewing data, while aggregate measurements provide the actual content being analyzed. Together, they enable users to tailor reports and analytics to meet specific business needs and objectives.


Youtube video : Link

Entity store : Link

BYOD : Link

CloudFronts : Link

Efficient Data Reporting and Analysis : Link

Wednesday, August 9, 2023

Enqueue and Dequeue in Dynamics 365 FO

Enqueue:

Sending data from another system to Dynamics 365 F&O. When data needs to be transferred to Dynamics 365 F&O, it's placed into a queue (enqueued), awaiting processing within the Dynamics system.


Dequeue:

Sending data from Dynamics 365 F&O to another system. After the data has been processed within Dynamics 365 F&O, it can be removed from the queue (dequeued) and sent to another system as needed.


So in summary:

Enqueue is related to receiving data into Dynamics 365 F&O.

Dequeue is related to sending data from Dynamics 365 F&O to another system.

Link to understand Enqueue and Dequeue

Tuesday, August 8, 2023

How to create a logic app in azure to move files in SFP from one folder to another

Go to Azure portal : Azure

You will see window like below


Click on "Create a resource"


A new window will open, there search for "Logic apps", as shown below


Now new window will come like below, select create > Logic App


Now new window will come like below


Enter the resource group, logic app name, select the region, select the plan type as consumption

Now click next > Next, you will see a window like below


Click on create

Deployment will take some time, now go to the resource
The moment you will go to resource, Logic app designer will be opened automatically like below


Go downwards and click on 'Blank logic app'


Logic app designer will open like below


Search for appropriate triggers, in my case I will be searching for "Recurrence"
Select the icon shown below


after that select Recurrence again as shown below


New window will open like below


Set in the parameters acc to your need, I will be setting Once a day
Now click on Next step, a window will open like below, where you can select actions


Now select variables, and select in "Initialize variable" like below


Now fill in the name of the variable and type like shown below


Now you may rename the action as well, as shown below


Now do the same for "To path" variable as shown below


Now add an action and 'SFTP' and select 'List files in folder', as shown below


you will see something like below


In my case I have already setup the SFP connection, but you can also setup like below


Fill in the connection name, host server address, username and password (click on disable SSH host key validation) if you are using username and password

Now save the connection and make it as default

Now click on the Folder, a lookup will come like below


Selected 'From path' from the variables, final should look like below


Now click on, New step and  search for 'For each' in control


Now select the 'body', as shown below


Rename the 'For each' to 'Move to each file' and Now the logic app should look like below


Now select an action inside the loop, now search for condition and select like shown below


Now condition action will be added, there you can select Name in the condition as shown below


expression should look like below


Now in the true side, search for SFTP and select "Copy file" as shown below


Now the copy file action should look like below


the 1st expression in the Destination file path is utcNow('yyyy')
and the 2nd expression in the Destination file path is utcNow('MM')

Now below that action add an action 'Delete file' as shown below


Now configure the Delete file action like below


Tada!!!


Monday, July 3, 2023

How to convert a UTC DateTime value to a user-specific timezone in X++

 public static void main(Args _args)

{

    TransDateTime utcDateTime, localDateTime;

    utcDateTime = DateTimeUtil::utcNow(); // gets the current UTC date and time


    // convert UTC time to user time zone

    localDateTime = DateTimeUtil::applyTimeZoneOffset(

        utcDateTime,

        DateTimeUtil::getTimeZoneOffsetForUser()

    );


    info(strFmt("UTC DateTime: %1", utcDateTime));

    info(strFmt("Local DateTime: %1", localDateTime));

}


Thursday, June 15, 2023

How To Call A Form From Another Form

The following blog by Peter is one of the best blog I have found:

How To Call A Form From Another Form - Dynamics 365 Musings

All the aot query joins in dynamics 365 FO X++

In this blog of Dynamics Community 101 we will learn about AOT query joins in Dynamics 365 F&O X++


Here are the different types of joins you can perform in X++:

1. Inner join: The inner join is the most common type of join. It returns rows from both tables where there is a match. If there is no match, the row is not included in the result set.
select custTable
join custTrans
where custTable.AccountNum == custTrans.AccountNum;


2. Outer join: The outer join returns all the rows from one table, and matched rows from the other table. If there is no match, the result is null on the side of the table that doesn't have a match.
select custTable
outer join custTrans
where custTable.AccountNum == custTrans.AccountNum;

3. Exists join: The exists join returns rows from the first (or left) table for which there is a matching row in the second (or right) table.
select custTable
exists join custTrans
where custTable.AccountNum == custTrans.AccountNum;

4. NotExists join: The not exists join returns rows from the first (or left) table for which there is no matching row in the second (or right) table.
select custTable
notexists join custTrans
where custTable.AccountNum == custTrans.AccountNum;


Example:

The Employees table:

Employee table data

The Department table:


1. Inner Join

The inner join will still only return records where there is a match in both tables. However, because the DeptId 10 appears twice in the Departments table, the employee with DeptId 10 will appear twice in the result:


2. Outer Join

The outer join will return all records from the Employees table and the matching records from the Departments table. The employee with DeptId 10 will appear twice, and the employees with DeptId 40 and 50 will have null for DeptName:


3. Exists Join

The exists join will return records from the Employees table for which there is a matching record in the Departments table. Because the exists join only checks for the existence of a match, the duplication in the Departments table doesn't affect the result:


4. NotExists Join

The not exists join will return records from the Employees table for which there is not a matching record in the Departments table. This result is also unaffected by the duplication in the Departments table:


Current date time Dynamics 365 FO

utcdatetime now = DateTimeUtil::applyTimeZoneOffset(datetimeutil::utcnow(), DateTimeUtil::getUserPreferredTimeZone());

Thursday, April 27, 2023

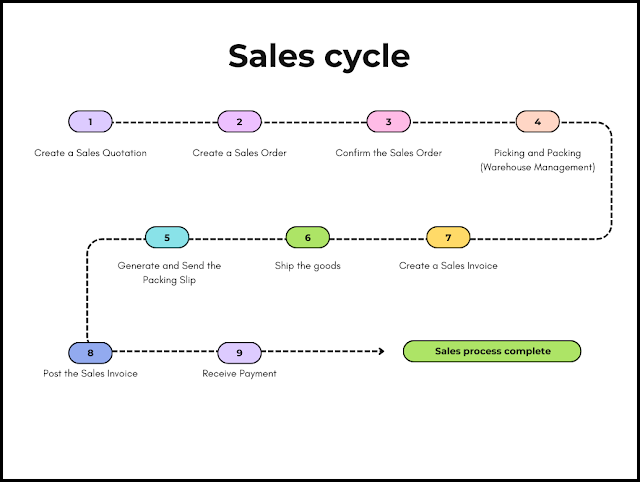
Sales cycle in D365 FO

In this blog of Dynamics Community 101 we will learn the Sales cycle in D365 FO


Sales cycle in Dynamics 365 F&O

In Dynamics 365 Finance & Operations (F&O), the sales cycle is similar to the purchase cycle, but it involves different steps and documents as it focuses on the selling side of the business. The typical sales cycle in Dynamics 365 F&O includes the following steps:


Create a Sales Quotation (optional): If a customer requests a quote, you can create a sales quotation to provide the customer with pricing and delivery information. This step is optional, as not all sales processes involve quotations.


Create a Sales Order: Create a sales order for the customer, which is a formal agreement between the seller and the buyer, detailing the products or services being sold, their quantities, and agreed-upon prices.


Confirm the Sales Order: Confirm the sales order, which will finalize the agreement and trigger subsequent processes such as inventory reservation, picking, and packing.


Picking and Packing (Warehouse Management): Based on the confirmed sales order, the system will reserve the inventory, and the warehouse team will pick and pack the items for shipment.


Generate and Send the Packing Slip: Generate a packing slip to be included in the shipment. This document outlines the contents of the package and can also be sent electronically to the customer.


Ship the goods: Ship the products to the customer using the agreed-upon shipping method.


Create a Sales Invoice: Generate a sales invoice, which is a formal request for payment from the customer. This document includes information about the products or services sold, quantities, prices, taxes, and any applicable discounts.


Post the Sales Invoice: Post the sales invoice to update the general ledger and accounts receivable. This step finalizes the accounting process and ensures that the financial records are accurate.


Receive Payment: Receive and process the customer's payment, applying it to the appropriate sales invoice and updating the accounts receivable.

Thursday, April 20, 2023

Delete actions in Dynamics 365 FO

 In Microsoft Dynamics 365 Finance and Operations (F&O), there are several types of delete actions that help maintain data integrity across related tables. These actions define how the system should behave when a record in the primary table is deleted. Here are the main types of delete actions:


1. No action: No action is taken when a record is deleted in the primary table. This means that related records in the secondary table will remain unchanged, which may lead to orphaned records.


2. Cascade: When a record is deleted in the primary table, all related records in the secondary table are also deleted. This ensures that no orphaned records are left behind, maintaining referential integrity.


3. Restricted: If there are related records in the secondary table, the system prevents the deletion of the record in the primary table. This ensures that all related records are addressed before the primary record can be deleted.


4. Cascade + Restricted: This is a combination of the Cascade and Restricted actions. If there are no related records in the secondary table, the primary record can be deleted. If there are related records, the system will first attempt to cascade delete the related records. If any of the related records cannot be deleted due to other restrictions, the system will prevent the deletion of the primary record. Example : Imagine you have two tables: a "Customers" table and an "Orders" table. The Customers table contains information about your customers, and the Orders table stores their orders.

Now, let's say you want to delete a customer record from the Customers table. With the Cascade + Restricted delete action, the system will check if there are any orders associated with that customer in the Orders table.

a. If there are no related orders, the customer record will be deleted without any issues.

b. If there are related orders, the system will attempt to delete all those orders first (Cascade).

c. If any of the related orders cannot be deleted due to restrictions (like dependencies on other tables), the system will prevent you from deleting the customer record (Restricted).

In this way, the Cascade + Restricted delete action ensures that all related records are either deleted or addressed before deleting the primary record, maintaining data integrity and avoiding potential issues.

Tuesday, April 18, 2023

Dynamics 365 Finance and Operations (F&O) supports several types of synchronous and asynchronous integrations

Dynamics 365 Finance and Operations (F&O) supports several types of synchronous and asynchronous integrations


Synchronous Integrations:

OData Services: OData is an open standard protocol for creating and consuming RESTful APIs. Dynamics 365 F&O exposes OData services that can be used to read and write data in real-time.

Custom Services: Dynamics 365 F&O allows developers to create custom services using .NET or X++ code. These services can be invoked synchronously and can provide real-time integration with other systems.

Logic Apps: Logic Apps is a cloud-based service from Microsoft that allows users to create workflows to automate business processes. Dynamics 365 F&O provides connectors for Logic Apps, allowing users to trigger workflows synchronously when specific events occur in the system.

Service Bus: Dynamics 365 F&O supports integration with Azure Service Bus, which provides a reliable messaging platform for exchanging data between systems. Service Bus can be used to implement real-time integration patterns such as publish/subscribe and request/reply.


Asynchronous Integrations:
Data Management: Dynamics 365 F&O provides a data management framework that allows users to import and export data to and from the system asynchronously. Users can schedule data jobs to run at a specific time or on a recurring basis.

Power Automate: Power Automate (formerly known as Microsoft Flow) is a cloud-based service that allows users to create workflows to automate business processes. Dynamics 365 F&O provides connectors for Power Automate, allowing users to trigger workflows asynchronously when specific events occur in the system.

Data Entities: Dynamics 365 F&O provides data entities that can be used to extract data from the system asynchronously. Users can schedule data entity exports to run at a specific time or on a recurring basis.

Batch Framework: Dynamics 365 F&O provides a batch framework that allows users to run long-running processes asynchronously. Users can schedule batch jobs to run at a specific time or on a recurring basis.

File-based Integrations: Dynamics 365 F&O provides support for file-based integrations, where data is exchanged between systems using flat files such as CSV, XML, or JSON. Users can schedule file-based integrations to run asynchronously at a specific time or on a recurring basis.

Tuesday, April 4, 2023

Legal entity in Dynamics 365 FO | Functional 1

A legal entity is a group or organization that has been officially recognized by the government. It can sign contracts and has to make reports about how well it's doing.


How to create a Legal entity in Dynamics 365 F&O:

Go to organization administration module and open Legal entities as shown in the picture

a new form (Legal entity) will open like below


now click on New button as shown in the picture


A new dialog form will open like below


Fill in the information like below


now click on "ok"

Once the legal entity is created, it will be opened automatically as shown in the below screenshot


Put in the Memo/Description of the organization, Language, Time Zone, etc as shown in the picture below


Now go to address tab and update accordingly

I have added an address for Delivery as shown in the picture below (in the advanced option you can see some hidden settings like tax information, registration id and some more settings)


now coming down to contact information for the entity, click on add and add the details as shown below and click on save, in my case I am saving Telephone and email id (you can make it as primary if required, also in the advanced option you can see some hidden settings)


Also, if we go below and check Dashboard image/ banner, we can set as per our requirement, just click on banner in the 'Dashboard company image type' and then click on change as shown below


Reference: TechTalk365